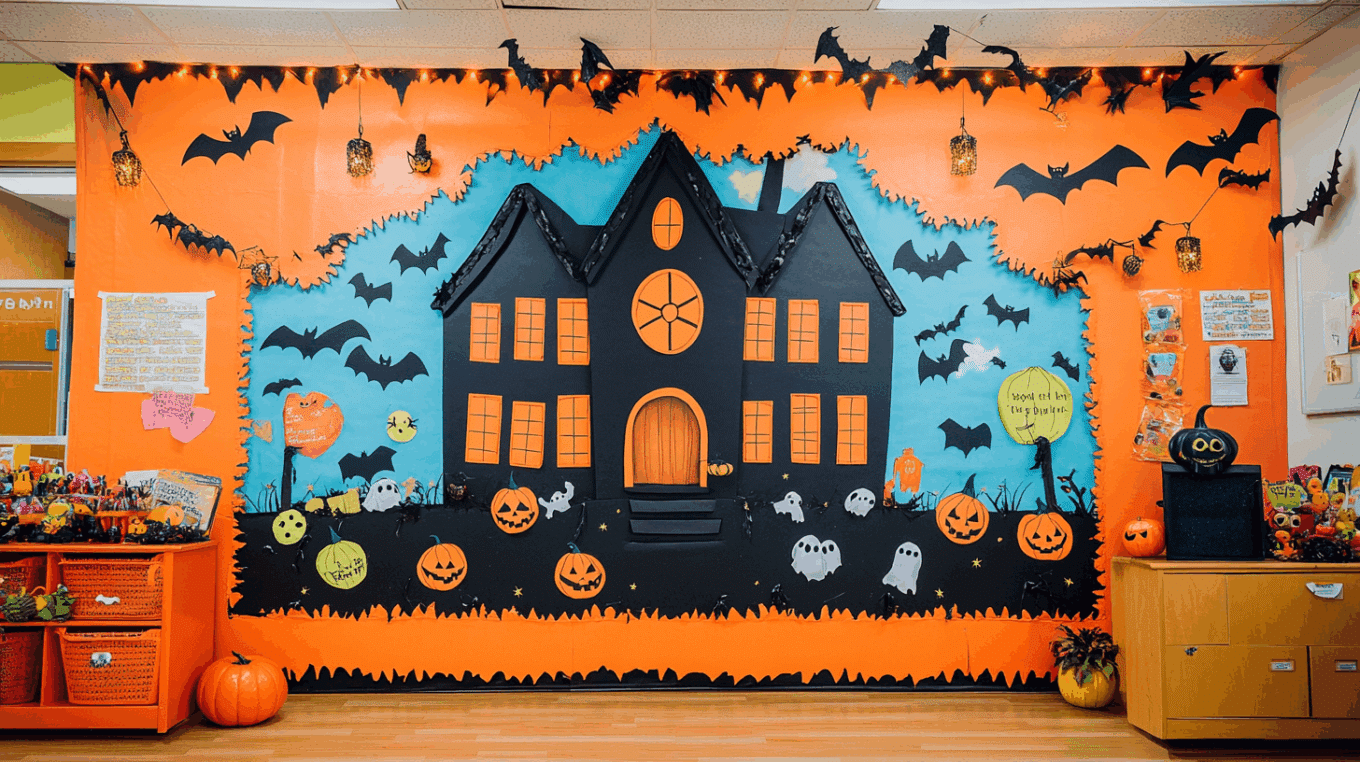
Looking for a way to make your classroom or hallway frighteningly fun this Halloween? Haunted house bulletin boards add just the right amount of spook to any learning space.
Many teachers struggle to create displays that are both festive and educational without spending too much time or money.
This blog offers both ready-made kit recommendations and step-by-step DIY instructions for creating your haunted displays.
From choosing themes like “Spooky Science” or “Haunted Library” to adding personalized student work, we cover everything you need.
By the end, you’ll know exactly how to change ordinary bulletin boards into special Halloween showcases that will have students excited to learn. Ready to create a hauntingly good display?
Step-by-Step Guide: DIY Haunted House Bulletin Board
Creating a spooky haunted house bulletin board doesn’t have to be scary! Follow these simple steps to make a Halloween display that will thrill your students or children.
Step 1: Choose Your Theme

Begin by selecting a theme that aligns with your classroom objectives or personal aesthetic.
- Haunted Library: Fill your haunted house with book characters and reading quotes. Add speech bubbles with famous lines from scary stories.
- Spooky Science: Create a mad scientist’s laboratory with beakers, test tubes, and science vocabulary words hidden throughout.
- Ghost Town: Design an old western town with ghost residents. Great for history lessons or western-themed units.
- Monster Academy: Make a school for friendly monsters with classroom rules and student monsters.
- Halloween Habitat: Show different rooms where bats, spiders, and other Halloween creatures live.
Step 2: Gather Materials

Before starting, collect everything you need. Base materials include your bulletin board and background paper in black, purple, orange, or night sky print.
For structure elements, gather brown or gray construction paper for the house and yellow paper for the windows.
You’ll need characters like pre-cut or hand-drawn ghosts, bats, spiders, and monsters. Don’t forget borders such as orange and black scalloped edges, fence cutouts, or spiderweb trim.
Fasteners like staplers, push pins, glue sticks, and double-sided tape are essential. Consider extras, including glitter, cotton for cobwebs, and foam pieces for 3D effects.
To save money, check dollar stores for Halloween items that can be cut up and reused on your board.
Step 3: Create Background

The background sets the mood for your haunted display. Cover your board with dark blue or black paper for a night sky effect.
Cut a circle from yellow or white paper to add a moon. Along the bottom, create dimension with torn paper “hills.”
Make simple stars by adding small white dots with chalk or a paint pen. For extra atmosphere, try sponge painting purple or gray clouds.
A quick way to add spookiness is to use a sponge dipped in white paint to create a foggy effect along the bottom of your board.
Step 4: Add Main Elements

Now, build your haunted house and key features. Cut a large house silhouette from brown or black paper. Add windows with yellow or orange paper to look like lights inside.
Cut doors that can open to reveal surprises underneath. Place bats hanging from the top of the board and add ghosts that float around the house.
Include a fence made from popsicle sticks or black paper. Create trees with twisted branches from brown paper.
For consistent designs, make templates for your main shapes first, then trace them onto colored paper.
Step 5: Personalize with Student Work

Add student elements to make the board meaningful. Create tombstones with student names or positive messages.
Have students write short scary stories to post on or around the house. Let each child design a window or room of the house.
Post student-drawn monsters or ghosts. Add speech bubbles with Halloween jokes written by students. Include a section for students to add new elements throughout the month.
To practice descriptive writing, have students write character descriptions for the “residents” of the haunted house.
Step 6: Final Touches

Finish your masterpiece with special details. Add battery-operated string lights around the border, but check school safety rules first.
Curl paper edges or use foam mounting squares to create 3D effects. Use them to create interactive elements like lift-the-flap windows or doors.
Include QR codes linking to spooky (but age-appropriate) stories. Use glow-in-the-dark paint for special highlights. Hang small items like plastic spiders from a thread for movement.
Take a photo of your finished board to keep for next year’s planning.
With these steps, you’ll create a fun and functional haunted house bulletin board for your classroom. The spookiness levels can be adjusted to suit the age of your students.
Haunted House Bulletin Board Kits
Doesn’t matter if you want ready-made decorations or enjoy crafting your own; these options make it easy to create a spooky and fun display.
These ready-made kits make it simple to set up your haunted house bulletin board. They come with all the decorations you need for a fun and spooky display.
1. Halloween Haunted Portrait Backdrop Kit
The Halloween Haunted Portrait Backdrop Kit adds a spooky vibe to your party or classroom. The changing face design surprises guests, making it perfect for haunted houses or photo booths.
It’s lightweight, easy to hang, and made from durable polyester. Use it on walls, on doors, or as a party prop for a fun Halloween setup.
2. Halloween Classroom Bulletin Board Kit
Decorate your classroom or home with the Halloween Classroom Bulletin Board Kit. It includes banners, bat name tags, fun Halloween cutouts, borders, and adhesive dots for easy setup.
Made from sturdy, fade-resistant paper, it’s perfect for Halloween parties, classrooms, or photo booths. Create a festive and fun display with bats, pumpkins, haunted houses, and more.
3. Halloween Castle Photo Bulletin Board Kit
Decorate your classroom with the Halloween Castle Photo Bulletin Board Kit. It’s big, colorful, and full of fun Halloween elements like castles, ghosts, pumpkins, and witches.
Add up to 20 photos or write messages to create a festive wall display. Made from strong, reusable paper, it’s perfect for classrooms, parties, or home decoration.
4. DIY Haunted Mini House Kit with LED Lights
Build your spooky scene with the DIY Haunted Mini House Kit with LED Lights. This wooden puzzle includes creepy furniture, bats, spiders, and colorful LED lights.
It is perfect as table decor or a gift for craft lovers and takes about three hours to assemble. Enjoy fun, hands-on crafting and light up your space with eerie charm.
Creative Bulletin Board Sayings
Add extra fun to your haunted house bulletin board with creative sayings.
A well-chosen phrase can grab attention and make your display even more engaging for students, party guests, or anyone passing by. Below are some of them.
- “Enter If You Dare!” makes a perfect greeting above your haunted house door, warning visitors of the spooky fun inside.
- “Welcome to Our Haunted Classroom” works great as a main title across the top of your board, setting the Halloween mood.
- “Spook-tacular Students Inside” showcases the children’s work displayed within the haunted windows, drawing attention to their creative efforts.
Budget-Friendly Tips
Decorating for Halloween doesn’t have to cost much. With these budget-friendly tips, you can create a spooky and fun bulletin board using affordable supplies, DIY tricks, and smart ideas to save money.
- Use coffee filters dipped in water and a black marker to create bleeding “spooky” ghosts.
- Turn paper lunch bags into haunted houses with simple cut-outs and markers
- Make spiderwebs from white yarn or string from the craft closet
- Create bats by folding black construction paper scraps
- Cut tissue paper into flame shapes for spooky lighting effects
- Repurpose old bulletin board borders by coloring them with orange and black markers.
Final Thought
Creating a haunted house bulletin board brings the Halloween spirit into your classroom while supporting learning goals.
Both store-bought kits and DIY approaches offer viable options, depending on your time, budget, and level of creativity.
Remember to match your theme to your teaching objectives, use budget-friendly materials when possible, and involve students in the process.
As the season changes, many elements can be saved for next year or changed for different holidays.
The most successful bulletin boards combine fun visuals with educational content, making learning more engaging during the Halloween season.
We hope these ideas inspire you to create a display that’s perfect for your classroom..
